

 Hai! Cantik x picta yg i edit ni??? Actually baru blajo sndr melalui internet. Tgh bosan2 ni dan rindu kt seseorang.... Ok macam ne nak dapat side effect yg wow ni? Actually i blajo sendiri melalui laman web http://www.photoshopsupport.com/tutorials/or/cross-processing.html ni.
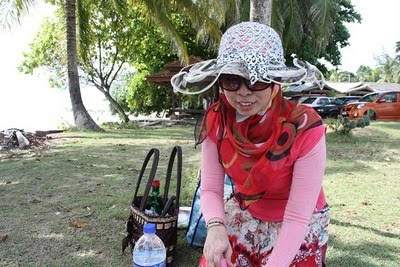
After open picta yg kita nk edit kt photoshop klik "Create new fill or new adjustment layer" icon kt Layers palette dan pilih Curves. Dari Channel drop-down box, pilih Red channel and drag atas belah kanan curve sedikit ke kiri. Then drag the beberapa point kt curve utk membentuk S — darkening the shadows and brightening the Red channel's highlights.
 Step 2
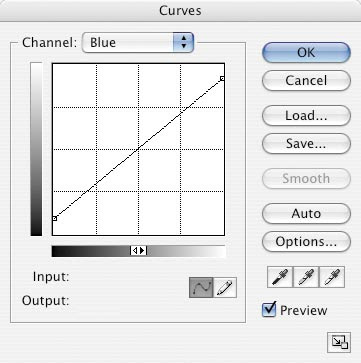
Pilih Blue channel and drag the curve's belah atas-kanan ke bwh skit. xperlu banyak sgt— just enough to take some blue out of the highlights. Then drag the curve's belah bwh -kiri ke atas sedikit, blocking up the Blue channel in the shadows.
Step 3
Pilih Green channel pula, dan bentuk another S curve — increasing the contrast, especially in the highlights.
 Step 4
For RGB just leave as it is. Focus on the color balance rather than the contrast, which you can fix later, in step 6.
 Step 5
From actual tutorial they changing the Curves adjustment layer's blending mode to Color and the image will combine the color shifts with the image's original luminosity. But for mine i just leave to normal cause pakai normal mcm lg cantik utk picta i. However it up to the eye of beholder.

Step 6
If you need to fine-tune the image contrast, add a Curves adjustment layer and set its blending mode to Luminosity so it doesn't cause any further color shifts. Dlm step ini anda blh adjustRGB curve depends on ur image contrast is it enough or not. But for mine i juat leave as it is. Step 7
Another optional final step is to add a yellow color cast to the picture. In the Layers palette, click the "Create new fill or new adjustment layer" icon and choose Solid Color. Select a yellow-green and click OK, then reduce the new layer's opacity — 10% is as much as you'll need. For mine i just put 8%. Itupun mcm dh terlebih. Maby my picta already have sunlight which is yellow element.


Maka dptlah hasilnya.. Text tu pepandailah add sendiri.. xkan tu pun nak diajar...
Actually this picta xbape jd... but mata ni dh nmpak cantik aje...so just leave itlah... yg penting mata nmpak cantik ok lah tu....
No comments:
Post a Comment